

I’ve been wanting to do a fly-tying post for a while, so this week it will come in the form of a bonus post. Over the time I’ve been tying, I’ve messed around quite a bit with a lot of different patterns, including some of my own. In this case, I’ll be showing you how to tie a variation of a classic streamer pattern, and in the future I hope to share more of my tying knowledge. Obviously I am no where near an expert, but I think if you pay close attention, even the most experienced tiers will learn a thing or two.
I wanted to start with this pattern because it was the first fly I felt I truly made my own. I really wanted a good perch imitation for fishing some of the warm water fisheries around my area that have large populations of perch that other predators devour. I had just come across the Thunder Creek, an easy streamer to tie, and one that can look really good if tied right. Using the materials I had on hand, I tied up this pattern and was pleased. After adding some black bars using a permanent marker, I tied the fly onto my seven-weight rod and took it for a spin.
The bass devoured it! It didn’t matter whether I stripped it slow, fast, or let it sink to the bottom, I just couldn’t keep the fish off my fly. And it wasn’t just a one-time occurrence. I had similar luck in other spots around New England fishing for species like largemouth and smallmouth bass, pickerel, pumpkinseed, and even the occasional perch! I’ve heard perch will eat the eyes of other’s in their species when ice fishing, but never one of their living family members! I’m sure this pattern would also be killer for large brown and brook trout when streams get warm and perch are more plentiful, but I’ve never had the guts to try it out.
This fly sinks slowly, and is pretty bulky when tied correctly, so it is best to fish it on a six to eight weight sink-tip or sinking line. This will get it down to where the fish are eating, and also have enough power to properly present the fly. Without further ado, here’s the recipe:
School Bus Perch Thunder Creek
Materials:
Hook: 4x long streamer hook sizes 6-2 (here, a Saber #7041)
Regular thread: Anything strong (here, .004 monofilament)
Collar Thread: orange 8/0 or 6/0
Body: large gold tinsel
Belly: white bucktail
Lateral line: peacock herl
Mid Layer: yellow pearl krystal flash
Back: yellow bucktail
Directions:
- Start the thread on the hook shank about two eye lengths behind the hook eye. Wrap back to the barb before reversing directions and stopping at the starting point. Tie in the tinsel and wrap back to the barb again. Leave the thread at this point.
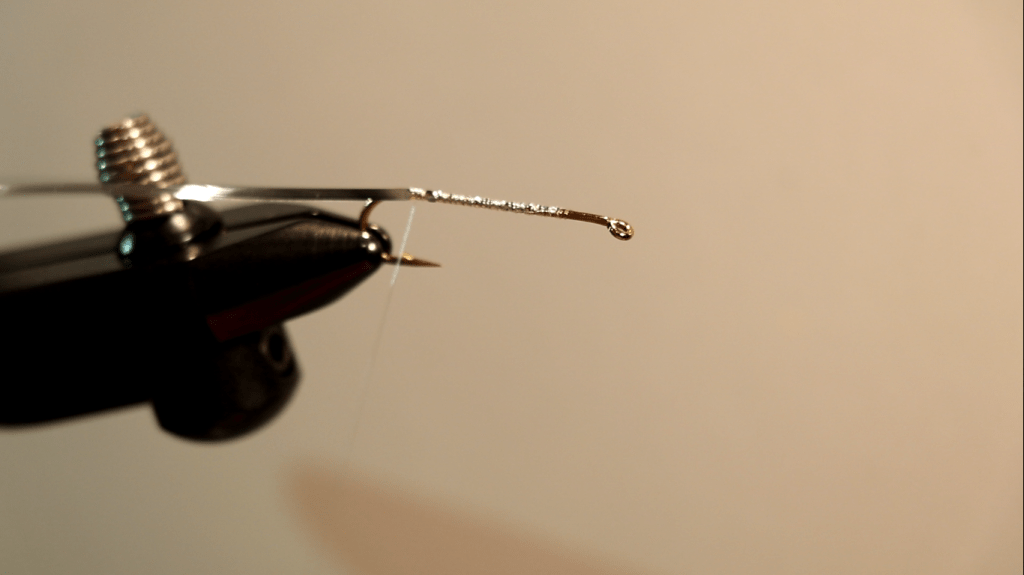
- Wind the tinsel forward to the initial tie-in point, pushing your thread along the way. Secure the tinsel and cut the excess. This doesn’t have to look perfect because it will mostly be covered up by materials in the end.

- Cut a large clump of yellow bucktail that is at least two-and-a-half hook shanks in length. You need enough hair to form a good looking head, but not so much that it begins to be overly bulky. This will come with experience. Starting slightly in front of the tinsel, tie in the bucktail facing towards the eye, stopping just before the eye. Clip the excess to form a small ramp that stops at the tinsel. Cover up this ramp with thread.
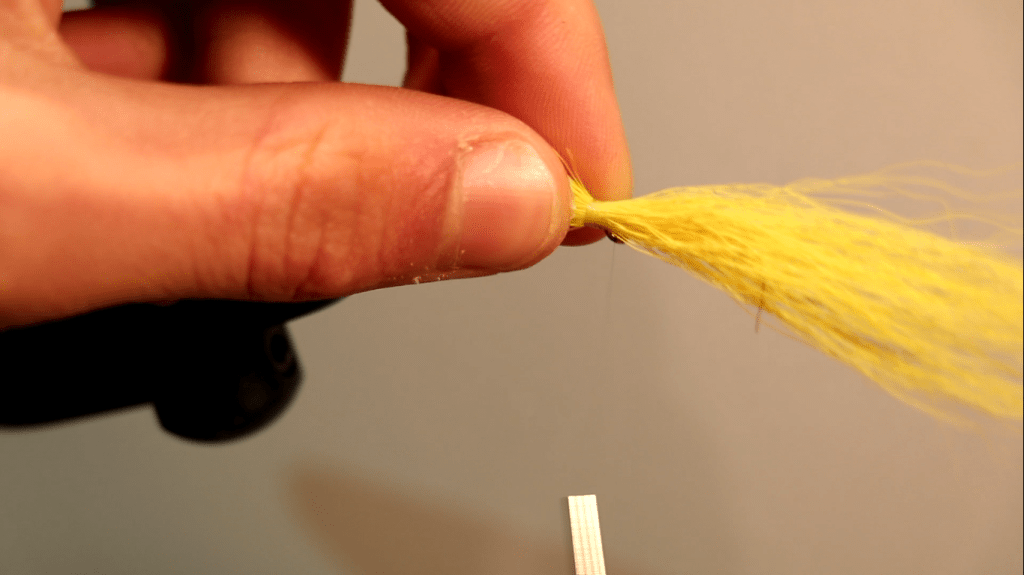
- Next, snip a small clump krystal flash free from the hank and taper it using the twist-and-slip method. Tie it in so that longest fibers are equal in length to the longest fibers of the bucktail. Again, clip the krystal flash to form a ramp and cover it in thread.

- The last material on the top is four or five peacock herls tied in using the same method as the past two materials. These should be slightly shorter than the bucktail and flash.

- Turn the hook over in your vise while maintaining the position of the thread.

- Cut a clump of white bucktail slightly thinner than the yellow bucktail. Tie it in using the same method as the previous materials, except on the opposite side of the hook. Wrap the thread down to the base of the ramp. This should be about the same length as the peacock herl.

- Separate the clump of white bucktail from from the other materials. Take your time here to ensure that you only get the white fibers. The better a job you do on this step, the cleaner the final product will look.

- Once the white bucktail has been separated, fold it backward and tie it down at the base of the ramp. Make sure when you pull it backward that the bucktail is as tight as possible.

- Flip the hook over to its original position. Again, fold back the peacock herl and tie it down at the base of the ramp. Repeat this process with the krystal flash, then the yellow bucktail.

- Whip finish either by hand or using a whip-finisher. Cut your tying thread free.

- Begin your orange thread where you just tied off your previous thread. After securing the thread, form a small collar just behind the thread. Whip finish and cut your tying thread free.

- Add a drop of head cement or UV cure resin to the thread wraps. Once it dries, you can add thin, evenly spaced black bars on the upper part of the fly to imitate the bars on a real perch.
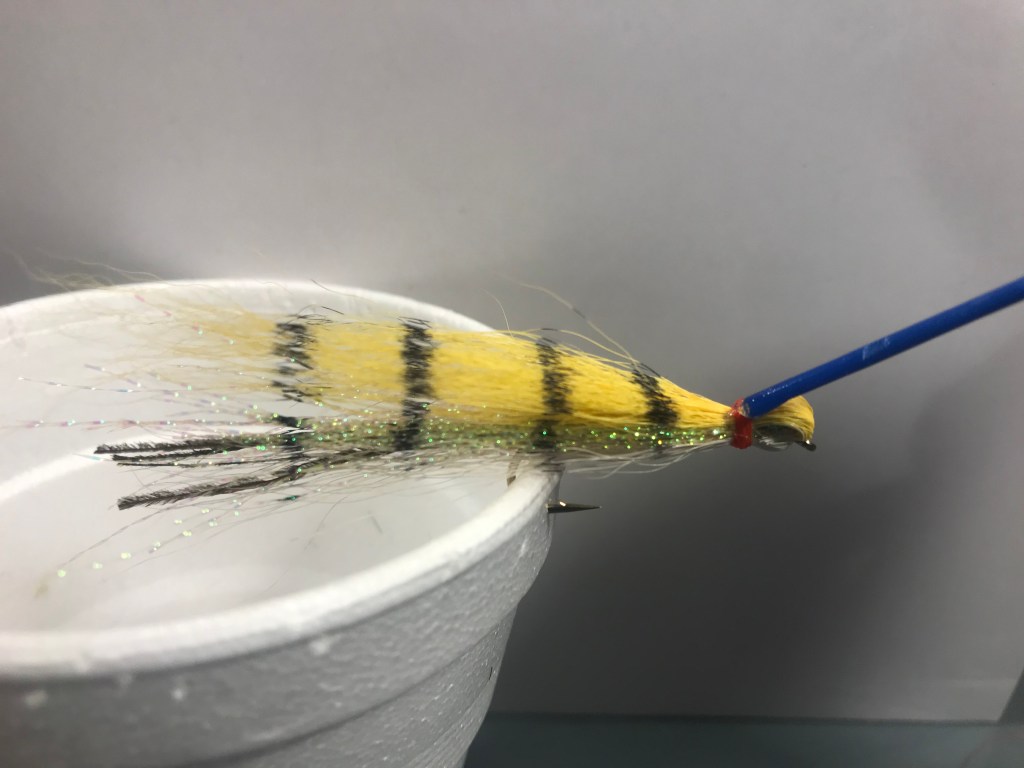
While this fly is fairly easy to tie, getting the proportions right can be tough. Stick with it, though, and you will soon be rewarded.
In a few weeks I plan to start selling flies on the site. My goal is to create a place where people can buy locally made flies for a modest price. Unfortunately, most of the flies you see in fly shops and online are now produced overseas, and with incredibly poor working conditions. I hope to create a quality product that focuses on the aquatic life of this region. I’d love to work with anyone if they simply can’t find the fly, or a variation of a fly they’re looking looking for in any shops. I also want to help anglers choose flies based on where and how they will be fishing. Be on the lookout, but for now, happy Thanksgiving!

4 thoughts on “Tying The School Bus Perch Thunder Creek Streamer”