

Tired of wasting massive amounts of perfectly good material when tying craft fur flies? Looking for a way to use the underfur from craft fur? Well look no further! This super-simple pattern is a great way to take advantage of this underutilized material, and turn it into an extremely effective fish-catching machine.
This fly excels in stillwater, although slower current areas in rivers are also a perfect place to give it a shot. Many species will eat it, especially when tied in a range of sizes. Smaller sizes like 12’s and 10’s work great for panfish and trout. 8’s and 6’s are perfect for small bass and trout. Large streamers, up to a size 4, will catch large bass and small pike. It can be tied in a number of color combinations in addition to the one I show here. My favorites are black fur with red or purple ice dub, imitating leeches, white fur with red or minnow belly ice dub to imitate minnows, and brown fur with black ice dub to imitate hellgramites, crayfish, and crane fly larva. Strip it fast, dead drift it, honestly, the fish don’t care. The marabou and craft fur undulate in the water, enticing even the most finicky specimens.
The fly is surprisingly simple to tie, requiring only three materials (in addition to the thread, hook, and lead-free wire, if you count it). It is essentially a take on a woolly bugger, but with a spiky dubbing body instead of the classic hackle and chenille. This pattern utilizes a split-thread dubbing technique, although a dubbing loop will work just as well, if not better in some cases. I often find that people are more likely to have a simple bodkin than a dubbing loop whirl, which is why I just split my thread here. Without further ado, let’s get to tying!
Materials:
- 4x long, 1x strong down eye streamer hook, or any other hook you’d like, sizes 12-4
- Black 6/0 thread
- Lead-free wire (0.015 for sizes 12-8, 0.020 for sizes 6 and 4)
- Black woolly bugger marabou
- Black craft fur
- Purple ice dub
- Start by securing the hook in the jaws of your vise. Wind 20-25 turns of lead-free wire, starting a little more than an eye length in front of the point, and ending a little more than an eye length back from the eye.

2. Get your thread started just behind the eye and snip off the tag. Take turns of thread over the wire, securing it in place so that it won’t shift. Go over the wire three times, and end with you thread just behind it.

3. Imagine the remaining hook shank split into fourths. Begin by wrapping over the first fourth, and return your thread to the wire. Then, cover the second fourth before bringing your thread back to the starting position. Continue this until you’ve covered all of the fourths, and bring your thread to the barb. You should now have a ramp built up to the wire so that the transition from hook to wire is smooth.

4. Select a good-looking black woolly bugger marabou feather, and pinch the tips off so that they are aligned and full, not wispy. Strip off the bottom third of the fibers from the stem. Next, wet the feather to make tying it in easier. Measure it to form a tail a little less than a hook shank in length, then transfer that measurement back to the barb. Take two loose pinch wraps, then pull down tight.
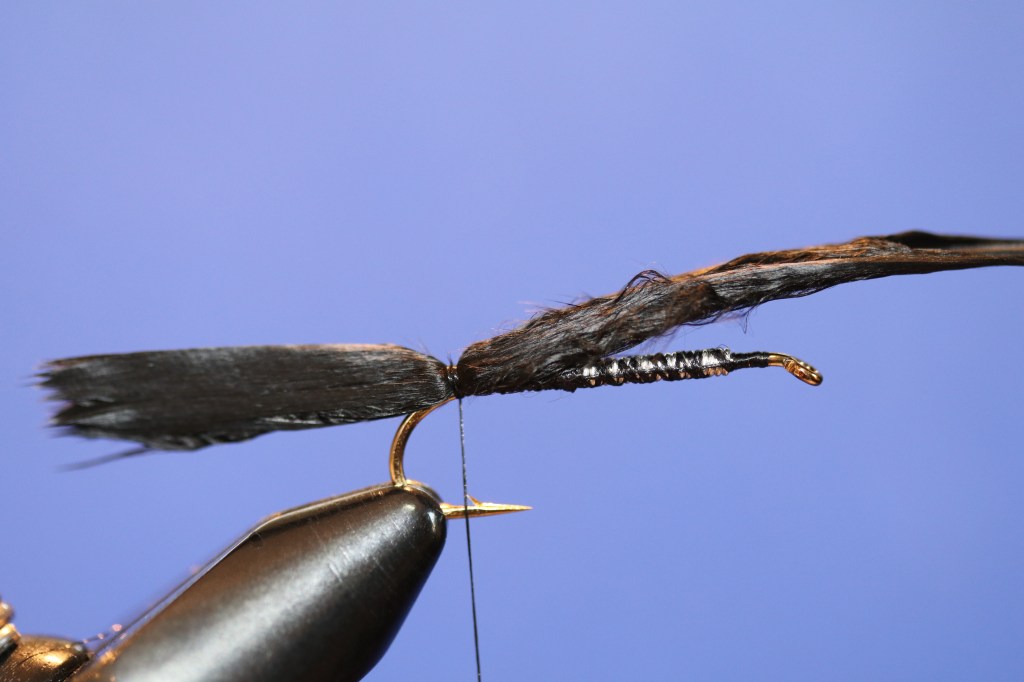
5. Advance your thread up to the end of the wire, snip off the excess, cover up the butts, and work your way back down to the barb.

6. Select a small clump of craft fur and snip it free from the “hide”. Grasp the clump about an inch from the tips.

7. Using a fine-toothed comb, stroke out all of the short fibers and underfur from the craft fur and set it down on your tying bench. Then, cut the long fibers that are left in your hand into thirds, and mix them into the clump of short fibers. You should be left with a clump of fur like this.

8. Pull a small clump of ice dub from the packet. Less is more here, as it will really shine through when the fly is finished. Set the dubbing down on the clump of fur.

9. Now it’s time to mix the fibers. You can do this with a few quick pulses in a coffee grinder, but here’s an easier way that has results that work just as well: simply grasp the clump lightly with one hand, and with the other, pull away the loose fibers. Put the loose fibers back into the clump, adjust your grip, and repeat the process until the dubbing is thoroughly mixed. Pull out small amounts of the mix and lay it in a line on your bench. This will be the dubbing you put in your dubbing loop, so make sure it is evenly distributed. This fly excels when it is sparsely dubbed, so don’t overdo it (it’s easy to do).

10. Spin your bobbin counter-clockwise to uncord the thread. Run your bobbin along the thread to flatten it out. The flatter you can make the thread, the easier the next step will be. Once it is as flat as you can make it, lay the thread over your finger while applying some pressure with the bobbin. The goal is to flatten it on your finger. Take your point of your bodkin and insert it into the middle of the thread. Poke the needle through and remove your finger. You should be left with two strands of thread connected only at the hook and the tip of the bobbin. Keep the strands apart by inserting your finger into the gap.

11. While keeping the strands separated, pick up the line of dubbing and slide it between the split thread. If the line of dubbing breaks apart while you’re picking it up, don’t sweat; just continue filling the gap until there is no room left. Ensure that the dubbing is equal throughout.

12. Remove your finger from the split thread and allow the thread to pinch the dubbing in place. Spin your bobbin clockwise to cord up the thread and the dubbing. Pull out any of the loose fibers and set them aside for another fly.

13. Wrap the spun dubbing all the way up the hook to just behind the eye. Repeat the split-thread dubbing as necessary while working your way up to the eye. When you finish wrapping the dubbing, stroke it back and take a few wraps in front to push the fibers back.

14. Form a small head on the fly, then whip finish and snip your thread free. If desired, apply a small drop of head cement or UV cure resin and let it harden.

Congratulations, your fly is now finished! Tie this fly in a wide range of sizes and colors, and enjoy the success that comes with it.


Clear instructions, great in process photos!
LikeLiked by 2 people
Thank you! It’s always a challenge to get good pictures of these relatively small flies. Still working on depth of field, though.
LikeLiked by 1 person